Photographers should invest some time and set up Google Analytics the right way, for their portfolio and blogs. As an amateur photographer I want to know how my photos are performing, what people like and which of my photos that they interact with. If I was looking for gigs, I would like to get any kind of leads and measure how well I’m marketing my photography business. That is why I put together The Photographers Guide To Google Analytics.
Step 1: Review or add the tracking script and account
First we need to make sure the Google Analytics Tracking Code is up to date and on all pages. If you can’t find the script on your pages, follow these steps to get going with Google Analytics on your website. If you have a friend and this friend says “use Google Tag Manager” you should slap them with a fermented herring. You want to get up and get going, not get books on javascript and sleepless nights.
There is a big chance you’ve been in the business a while and you’ve had Google Analytics for a couple of years. Then you could be using the Classic Analytics code, when you should be rocking the Universal Analytics one. Go to your website with any browser of your choice and look at the source code. With Google Chrome, you can right click on the page and choose View Source Code:
![]()
We’re looking for a javascript (marked above) that contains either google-analytics.com/analytics.js (goodie, you’re using Universal Analytics!) or google-analytics.com/ga.js (oh noes, you’re using the old code). If the Google Analytics Tracking Code isn’t implemented on all our pages, we could mess up the data pretty badly. Make sure the code is on all pages with a software called Screaming Frog.
Where do you find the Analytics Code to put on your website? Go to www.google.com/analytics/ and navigate to Admin > Property > Tracking Info > Tracking Code. If you’re using the Classic version, update and grab the new code.
This code belongs right before the </head> tag on all your pages. If you’re using WordPress, never mind the plugins, this little trick should work. Go to Appearance > Editor and choose header.php where you can paste the tracking code, right before the </head> tag and then hit Update file. Simple.
Now let’s have a look at the Google Analytics account itself. Is it structured the way it is supposed to? You should have three (3) Views where one is for reporting, one for testing and one for backing up the data. And make sure that you filter out bots and spiders. All set with the tracking code and Views? Goodie.
[shortcode id=”1187″]
Step 2: Can you see yourself?
When you have the Google Analytics tracking code on all pages of your portfolio or blog, open Google Analytics and navigate to Real-Time > Overview.
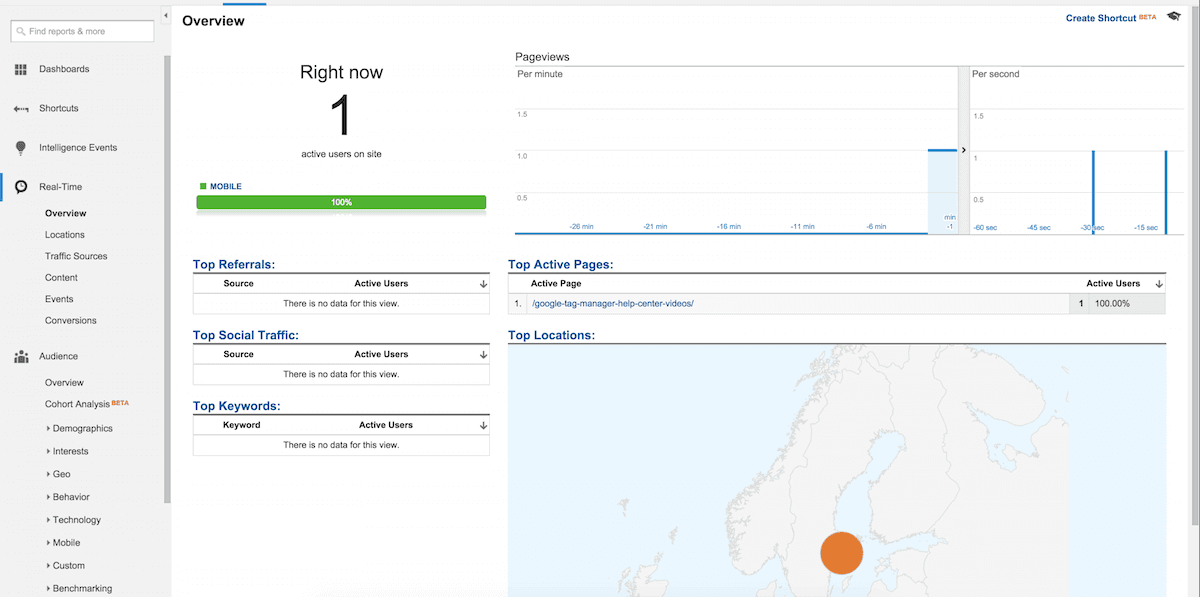
When you browse your own website, you should be able to follow and see yourself in the Real-Time report. If you do – you’ve implemented Google Analytics and this calls for a pint!
Step 3: Setting goals
We’re done with our pint and return to set some goals on our website. Goals vary vastly between websites. A goal on this site could be that you sign up for my newsletter or maybe that you read the page about me. For your own website it could be photographs shared on a specific social media or if visitors contact you. I’m here to give you an example.
Navigate to Admin > View > Goals.

For this blog one of my goals would be visitors learning about who I am. I want to keep lecturing about digital marketing and this blog as well as my blog in Swedish keeps connecting me with the right people. So I would set up a goal based on visitors reading the about me page. I would create a custom goal, name it “Read about Per” and use Destination as Type. If a visitors ends up on a specified Destination, like the page about me, a goal will recorded in Google Analytics.
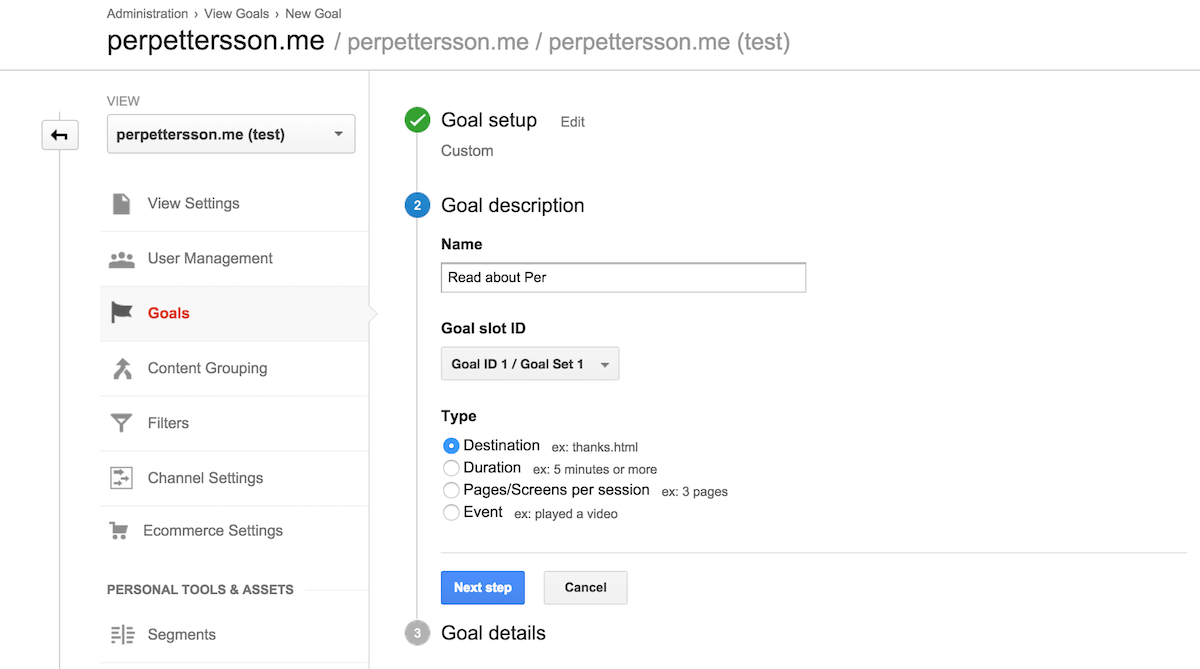
Next step is setting the Goal Destination. I want to track people reading the page at www.perpettersson.me/about/ so the Destination equals /about/. I wouldn’t spend any time wondering about values or funnels. We’re on a mission to get up and get going with Google Analytics. Not become experts in 20 minutes.

You can verify your goal and see how many conversions you would get based on the past 7 days. Create goal and we have 19 goals left to use, if we want to.

Step 4: Analysis
Give it a a few weeks, so we have a bigger batch of data to review, and then it is time for our analysis. Start by looking at Audience > Overview. This is a snapshot of how your website, blog or portfolio is performing. By default you are looking at All Sessions (see the marked area below). We want to change this from time to time so we can look at how visits (called Sessions in Google Analytics) differ from visits on mobile phones to visits that came from a link on Twitter etc. Learn to love and understand the Audience Overview. Don’t leave this page until you know what all metrics are and how to read them. I see many Google Analytics users try and understand all reports and then come to not a single conclusion, instead of looking at a small portion and make actionable decisions out of that.

Sessions are visits and Users are, well you guessed it son. Users. Learn to love and understand the Audience Overview.
You’re now on your way to understand your visitors and how your content is performing. All thanks to the magic that is Google Analytics.
[shortcode id=”1271″]
Leave a Reply